User’s Guide
Before Race
Set Up Race in RunSignUp
in the Race Wizard page 1 (Basic Info) set Timers to FSRC Race Support Services
Set Up Race in RaceDay Scoring
click
 to the left of Select a Race
click MANAGE RACES
if race is already in the list, and listed as Upcoming
click the race to see the race dashboard
if race is already in the list, and listed as Passed
click RENEW
click the race to see the race dashboard
else if race is not on the list
click IMPORT A RACE ALREADY ON RUNSIGNUP
select the race date filter, click SEARCH
click the race you want to import
you’ll be shown the race dashboard
at the race dashboard, configure or verify the following
click Participants/Teams

click SET UP PARTICIPANT/GROUP SYNC
click SAVE SYNC SETTINGS (i.e., use defaults)
click Scored Events

click Quick Setup
set Start Time Location: Not a timed start
verify Actual Start Time is set to the race start time
click Save
click Streams

make sure “Time Machine” is under Assigned Streams (see Set up RaceDay Scoring)
Open Time Machine stream
Assign location to Finish (backup stream)
File extension csv
click Save
click Age Groups/Team Classifications
 to set up divisions
click SET TOP FINISHERS to set up overall finishers by gender
Description: Overall
How Many Overall xxx: set to desired number for each gender
click RANGE INSERT to set up age groups
click SAVE
click timing locations
 to set times
delete Start location
click Finish SETTINGS
set Consider Finish/Split Finish Times after (earliest expected Finish/Split Time): 12:00:00.00 AM race day
click SAVE
click reports
 to set up autosave
click AUTO-SAVE SETTINGS
click + under RunSignup Results
under Advanced Options
set Chip Time: [blank]
set Custom Field: Gender Place: Send as Whole Number
click ADD STREAM
click SAVE SETTINGS
Race Day
RaceDay Scoring Setup
On the laptop, start RaceDay Scoring
log into your RunSignUp account, if necessary
you need to know your password
your account must previously have been set up as a “secondary owner” of the FSRC Race Support Services “timing company” under RunSignUp
if you’re at the main dashboard
click MANAGE RACES
select the race
RaceDay Scoring should be active, connected to read from tmtility’s configured output file
Time Machine and tmtility Connection
turn on Time Machine
set up as normal (Event#)
LED on wireless interface should be blinking red
On the laptop, in browser, navigate to http://tm.localhost:8080/
create the Race using Races view, with date and start time configured the same as RaceDay Scoring
navigate to Results view for duration of the race
verify Race is set correctly
Note
after race, move csv file to a new race folder
verify Port is set correctly, then click Connect
LED on Time Machine wireless interface should change to steady green, Connect button display changes to Disconnect
If chip timing, synchronize actual start times
Note
it’s important this this is done soon after the race starts, and in any event before any participant finishes
If chip timing is in use, the chip timing system will send time of day for each result to RaceDay Scoring. For Time Machine backup results to work correctly, it’s important that the actual start time be synchronized between RDS and tmtility.
The actual start time can be driven by a GPS watch, be based on a ‘start’ timestamp from the chip system, or be determined by the first raw read time seen at the start by the chip timing system.
in RaceDay Scoring, under Scored Events
, update Actual
Start Timein tmtility, under Races, update Start Time for this race
Time Machine Operation
Use of the Time Machine (TM) is identical to the technique used prior to use of RaceDay Scoring data collection.
Time Machine is turned on and configured with a new race number in Cross Country Mode (the default)
initial time is set to 0:0:0 (the default)
printer should be turned on
when race starts
depress Start Time button
when runner approaches the finish line, if it is clear this will be the next finisher
“select” the runner’s bib number with the Time Machine keypad
as runner crosses the finish, depress ENTER button
sometimes too many runners will cross the finish line at the same time, or it won’t be clear which runner in a group will be first
as each runner finishes, depress ENTER button (i.e., there’s no “select” of the bib number)
tmtility Operation (scanner not connected)
tmtility displays a grid with TM Pos, Bib No, Time, similar to the Time Machine printer tape. In addition, the currently computed Place is displayed. tmtility allows the Bib No and Time to be edited, which can’t be done on the Time Machine itself. Normally the Time should not be edited, but the Bib No can be edited for the following cases
the bib number was not selected by the time machine operator (no bib number recorded)
the bib number selected by the time machine operator was mistyped (wrong bib number recorded)
the time machine operator recorded an extra result
the time machine operator missed recording a result
All of these cases can be corrected in tmtility.
The pull tag spindles should be collected periodically from the finish line. The pull tags should be reviewed to verify there is a row in the grid for each pull tag. After updating tmtility to match the pull tags, these results need to be confirmed to send them to the csv file.
Note
when editing rows, the grid display update is disabled. Deselect any selected row to resume the display updates
To fix an incorrect/missing bib number (or time)
click on the incorrect bib number (or time) to edit
to accept the edit, press ENTER on the keyboard or click away from the field
make sure the row is deselected to allow results display to resume (e.g., click on the row to deselect if highlighted)
To fix an extra finish result
click on the row with the extra result (row will be highlighted in grey)
click Delete at the top of the table and accept the popup challenge
To add a missing result
click New
enter Bib No and Time for the missing result (leave TM Pos blank)
click Create
To confirm a set of results
click on the row for latest result which is to be confirmed by clicking on the row (away from the bib number or time fields to avoid inline edit of these)
click Confirm at the top of the table
the confirmed rows will be displayed in green shortly thereafter, with the icon in the associated column – these results are added to the file which RDS reads
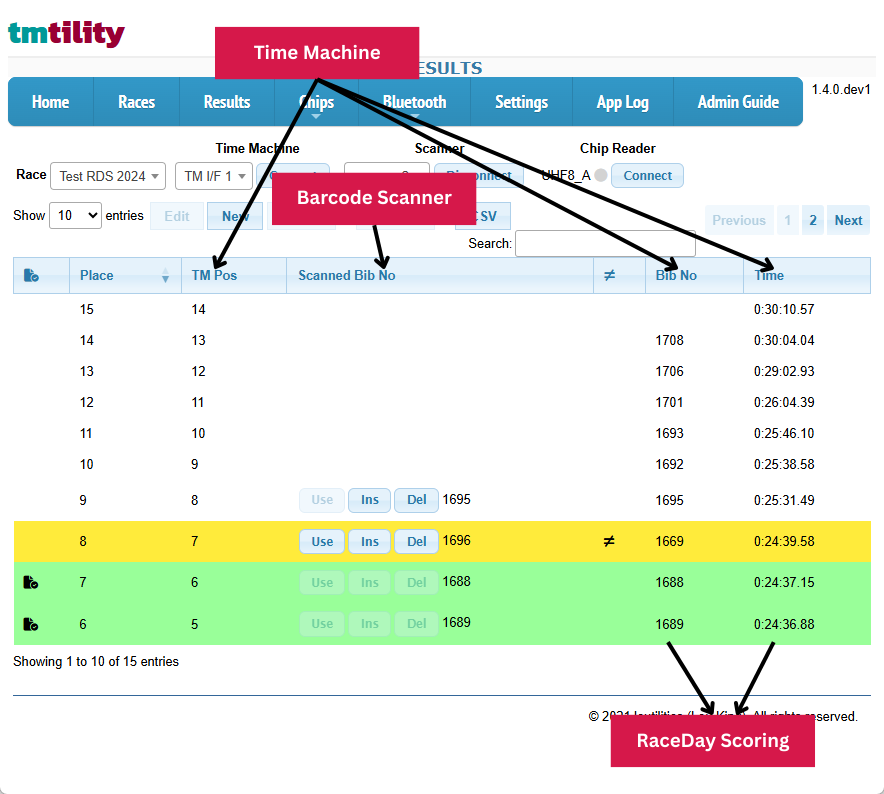
tmtility Operation (scanner connected)
tmtility displays a grid with TM Pos, Bib No, Time, similar to the Time Machine printer tape. In addition, the currently computed Place is displayed. With the scanner connected, there are Scanned Bib No and columns.
The scanner acts like a pull tag spindle. The scanner operator scans the bib number barcode on the front of each bib in order. This allows the tmtility operator to correct the Bib No in the results.
Under the Scanned Bib No column, there are controls to facilitate editing of the Bib No based on the scanned bib numbers which have been seen.
When using a scanner, the following cases are considered
the bib number was not selected by the time machine operator (no bib number recorded)
the bib number selected by the time machine operator was mistyped (wrong bib number recorded)
the time machine operator recorded an extra result
the time machine operator missed recording a result
the barcode scanner operator missed scanning a bib
the barcode scanner operator scanned the same bib multiple times
All of these cases can be corrected in tmtility.
Note
tmtility allows the Bib No and Time to be edited. However when using the Scanned Bib No controls, this should not be necessary.
To confirm a set of results
click on the row for latest result which is to be confirmed by clicking on the row (away from the bib number or time fields to avoid inline edit of these)
click Confirm at the top of the table
the confirmed rows will be displayed in green shortly thereafter, with the icon in the associated column – these results are added to the file which RDS reads
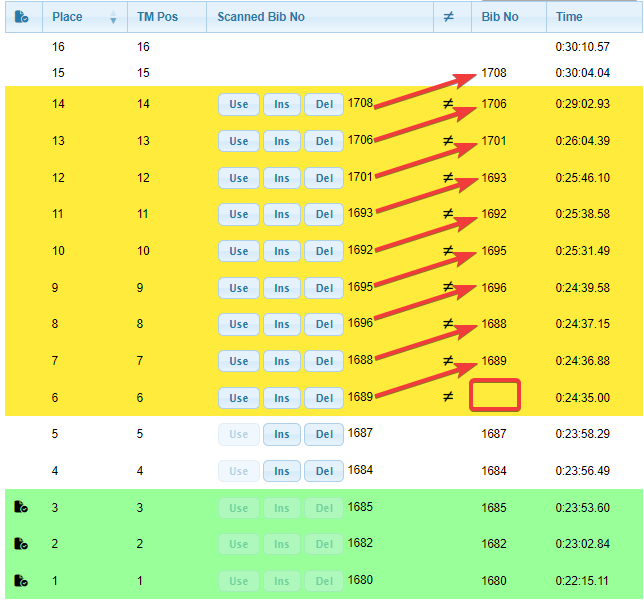
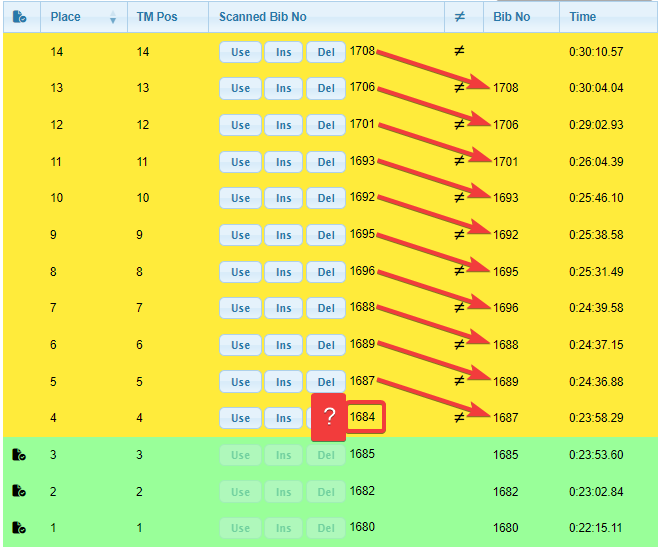
tmtility alerts the operator that there is something which needs to be corrected in two ways:
the row is highlighted in yellow
the column for the row shows , which means the Scanned Bib No doesn’t equal the Bib No
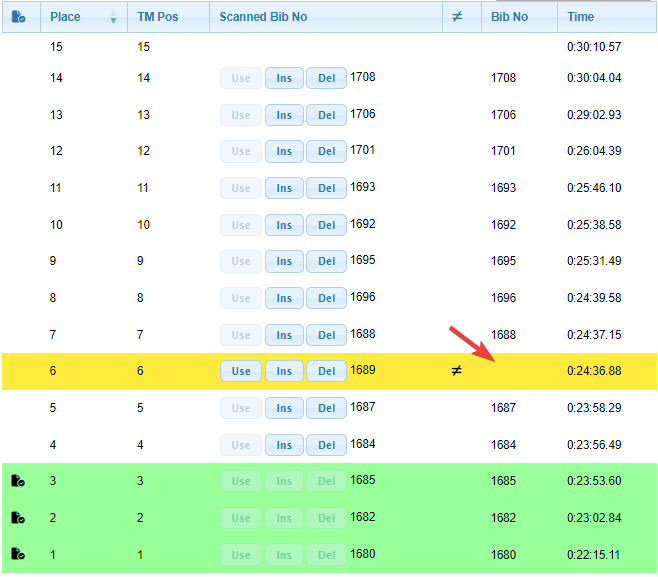
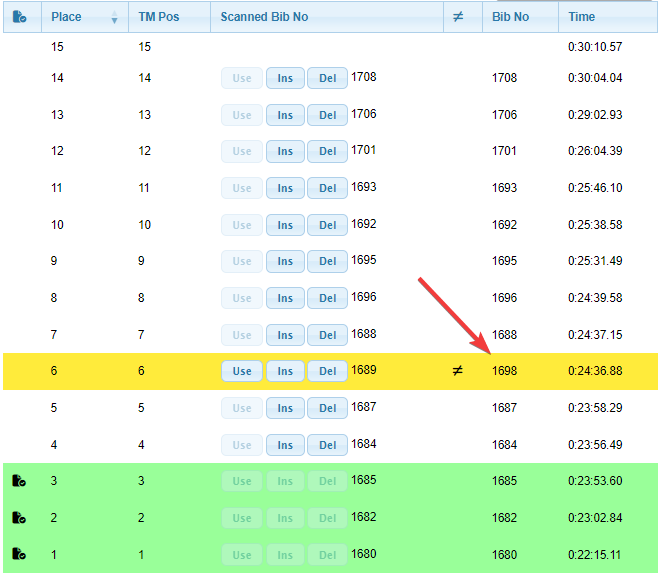
Results view Data Flow
In the following diagram you can see the data flow for the Results view.
The inputs from the Time Machine and from the barcode scanner are received by the system separately.
When the Time Machine operator enters each result, a row is inserted. The columns annotated by Time Machine come from the Time Machine, and the Place column is generated by the system.
When the barcode scanner operator scans each bib, the Scanned Bib No column (annotated by Barcode Scanner) is updated with each scanned bib going to the earliest result row which doesn’t already have a scanned bib. These are placed in that column in the order they were scanned.
If the scanned bib number doesn’t match the bib number from the Time Machine, the row is highlighted in yellow, as seen for Place 8.
Note
The full set of use cases are found in the sections which follow
When the operator confirms a set of results, the columns annotated by RaceDay Scoring are sent to the RaceDay Scoring software. After the operator confirms the set of results and they’re sent to RaceDay Scoring, they’re displayed in green.
Results view - barcode scanner connected inputs and outputs
Use Cases
No bib number recorded (unselected result)
Correction
on the yellow () row, click Use button to use the scanned bib number
Wrong bib number recorded
Example
Correction
on the yellow () row, click Use button to use the scanned bib number
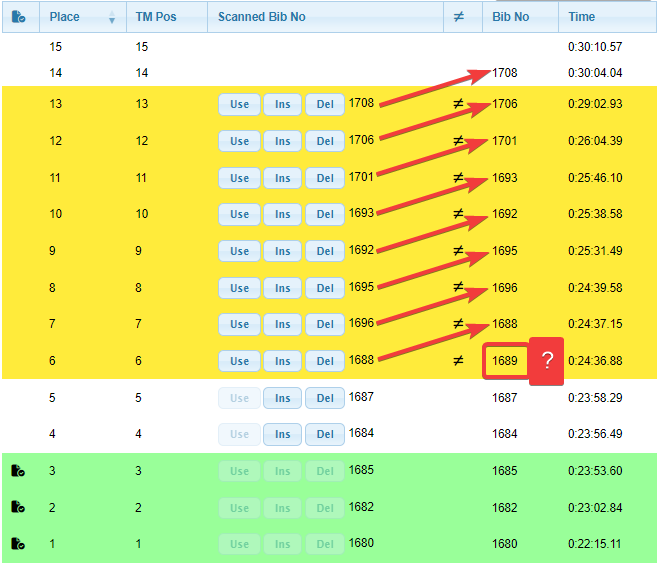
Extra result recorded
Example
Warning
This looks very similar to, and can be ambiguous with Missed scanning a bib
Correction
on the row with the extra result, click Ins button to insert an empty scanned bib
click on the extra result row, then click Delete at the top of the table and accept the popup challenge
Result missed
Example
Correction
click New edit control at top of table
enter bib number (match missing scanned bib), and time between the surrounding times
on new row, click Del to make scanned bibs line up
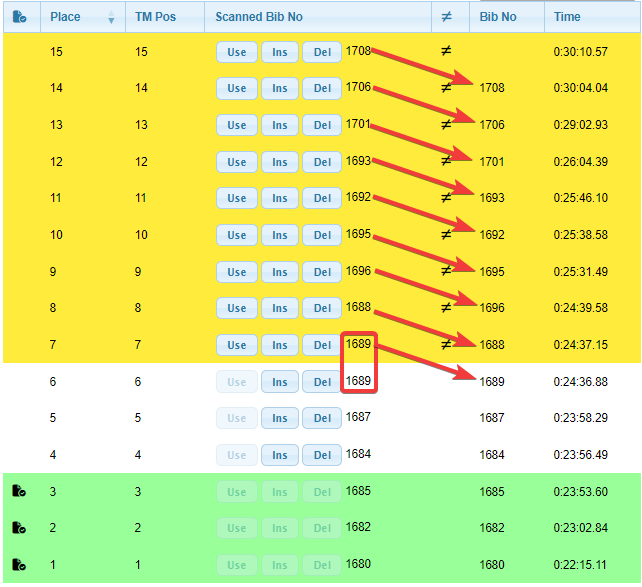
Missed scanning a bib
Example
Warning
This looks very similar to, and if this coincides with an unselected result can be ambiguous with, Extra result recorded
Correction
on the row with the missed scan, click Ins button to insert an empty scanned bib
Bib scanned multiple times
Example
Correction
on the yellow () row with the duplicate scanned bib, click Del button to delete the extra scanned bib
Bib Barcode Scanner Operation
In general, each bib should be scanned in order as the participant arrives in the finish chute. Having said that, a couple of situations can occur.
scanner lights go out
Simply depress the scanner’s trigger to wake up the scanner.
Note
the scanner plays an audio alert as it’s going to sleep
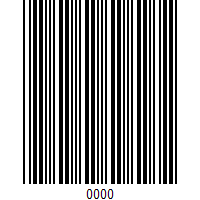
bandit crosses finish line
If a result is recorded at the time machine when there’s no associated bib, the 0000 barcode can be scanned. This is equivalent to putting a blank tag on a spindle.
RaceDay Scoring Operation
monitor Time Machine reads
click Reads

click YES, START THE CONNECTOR
light by Reads should turn green
problems must be fixed in tmtility
see tmtility Operation (scanner not connected) to fix bib number or time problems
results are not sent to the csv file which RaceDay Scoring reads until they have been confirmed in tmtility, so if all the confirmed results are correct, there is no need for any additional action in RaceDay Scoring
if any results which had been previously confirmed are subsequently edited in tmtility, the Time Machine stream needs to be replayed after removing any affected Raw Reads
Warning
the following is likely to change based on the outcome of louking/tm-csv-connector#48 RaceDay Scoring showing old result after edit
if any bib numbers were removed (e.g., in the case of a mistyped bib number, the bib number that was incorrectly entered was removed)
on the Dashboard
 view, click RAW READS
on the Raw Reads view, under Action select the bib number(s) which were removed, then click DELETE SELECTED READS
on the Streams
view, next to Time Machine click REPLAYon the Scored Events
view, click Saveclick Dashboard
to get back to the race overview
Note
the result updates are recalculated in the background so be patient
Awards
To see the awards, click Reports
the Age Group Report is probably the one you’re interested in
alternately, assuming internet connectivity, the results / awards can be seen on the RunSignUp race site under Results